
Care and Maintenence of Your Balefire Blade
- Apr 15, 2024
- 1 min read

The aftermath of battle is a staple of any heroic tale: the crackling gleam of a campfire, scarred heroes trading tales over tankards of sour red wine – and the meditative polishing of swords.
This is a moment of quiet, pragmatic reverence after the storm. An act of thanksgiving for the weapon that won the day. An act of preparation for the battle that awaits tomorrow.
While cleaning your blade in front of the TV after class holds a little less romance, we believe it’s still worth doing properly – to cement that bond of mutual protection and keep your weapon in tip-top condition for future bouts.
∴ A Note for the Online Edition ∴
We originally wrote this guide as a physical companion booklet to our Deluxe Care Kits. We have since decided to make this valuable guide available for free online, to help keep beautiful swords in action and make historical fencing a more sustainable hobby.
We have done our best to transform our little booklet into a functional online resource to help you quickly find answers and safely troubleshoot issues. Simply click the arrow next to the section you're interested in on the menu to expand it.
Where reference is made to wax, files and sanding blocks, these are the contents of our Deluxe Care Kits, which can be purchased here.
∴ General Maintenence ∴
We recommend a “little and often” approach to sword care, taking five minutes after each class or event to remove any tarnish and apply some wax – this way you can stay a step ahead of any serious rust issues.
To prevent tarnishing, don't pack your sword away alongside sweaty training gear. Make sure it is stored somewhere clean and dry between uses.
If it's to be stored for a long while, a generous amount of wax left to dry and buffed off will provide a good barrier - but keeping dust off is key, as the dust will absorb atmospheric moisture.
Don’t drop it in a lake.
∴ The Blade: Preventing Rust ∴
Keeping the blade clean and shiny is generally a good idea, although
some patination of the steel is almost inevitable with use - especially for
a fencing blade. Getting into good habits will keep the blade clean for longer.
At the end of each fencing session give the blade a wipe down with your clean towelling cloth, then rub a thin coat of your paste wax over the whole surface. Let this dry a little before giving the surface a light buff to even out the wax. After this it will be safe to store in a clean, dry place.
∴ The Blade: Removing Rust ∴
Red colouration indicates active rust that is eating away at the blade. Black “patina” is a stable form which is less of a worry, but it may cover red rust as it eats deeper into the steel. If in doubt, polish it off - lest you get a nasty surprise later on.
If you find red rust spots on your blade, rub the blade up and down with your 120 grit sanding block until the blade is clean or only mildly
patinated. Always sand from top to bottom, never across, as transverse lines spoil the look and are very hard to remove once established.
Your 120 grit block is about as rough as you should go for light corrosion. For deeper rust you may wish to invest in a progression of 180, 240, and 400 grits to smooth out the deep scratches. If using sandpaper, the progression is 80, 120, 180, 240 due to sandpaper's rougher aspect.
Each passage of the sanding block should be at a slight angle to the previous one, so you can ensure that the deeper marks are removed before moving to the next grit, and the last passage should be parallel to the edge of the blade to blend in with the native marks from the forge. This is a laborious process by hand, so we believe that prevention with a good beeswax coating is the superior option.
Sandpaper wrapped around a pencil can be used to clean a fuller. You may have to experiment with different diameters to clean different areas of the groove. Again, move from top to bottom of the fuller rather than across to avoid spoiling the finish.
A wipe down with WD40 or similar penetrating oil could help lift very fresh red rust, but be sure to add a protective layer of wax afterwards as penetrative oils do not provide long-term corrosion resistance.
∴ The Blade: Edge Maintenence ∴
Inevitably, percussive strikes on the edge of the blade will cause damage to the profile of the metal. Relative steel hardness, edge thickness, the nature of the impact, and a host of other factors will influence the degree of damage incurred.
Regardless, checking the edge of your blade should form a part of your post-training ritual. Most notches should occur early in the lifespan of the blade, as there is usually some bevel to the edge due to the polishing process.
∴ The Blade: Filing Away Burrs ∴
For shallower notches and burrs, pass a flat file along the edge of the blade, whilst keeping the plane of the file and the plane of the edge at a consistent angle. Gently run a thumb along the edge feeling for roughness, then lightly pass the flat file along the length of the edge, from forte to foible, in a stroking manner.
Pass at a 45-degree angle on one side of the edge, then the other, then flat on the edge. Keep the pressure light, just enough for the file to bite. Don't overdo the 45-degree passages as they can sharpen the blade. Always finish with the flat passage to avoid this risk.
If the roughness is pronounced do this a few times at different planes to the edge, then test again. Glassy smoothness is not necessary - after all, a certain amount of dimpling is the mark of a well-used blade - but anything that might snag is a serious issue.

∴ The Blade: Filing Deep Notches ∴
The vast majority of the broken blades I've seen over the years have had an unfiled, deep notch at the propagation point of the crack. Any areas with notches of 1.5mm or more need to be filed into a larger profile to reduce the danger of the blade breaking.
To do this, use your round file. Hold it perpendicular to the edge of the blade. File the sharp notch into a half-circle of the same depth, then round the peaks off. You will be left with a stable, non-snagging recess in the blade. Do not attempt to file the edge straight, as you will lose a huge amount of metal from the blade in the attempt, which could cause a weak area in the flex profile.

∴ The Blade: Proper Use of a File ∴
If used properly, the files included in this kit should last a great number of years. To prevent damage to the files, avoid a sawing back-and-forth motion. This will break the teeth of the files and greatly reduce their lifespan.
Instead hold the flat of the file against the edge of the blade at a 45- degree angle, and push it from tip to handle in a single stroking motion. Do not pull the file backwards for another passage, but lift it and repeat the first motion.
To smooth the edge you may hold the length of the flat file parallel to the edge of the blade. Again, avoid back-and-forth actions but use repetitive long, smooth pushing motions from top to bottom of the blade.

∴ Sets & Bends: Manufacturing Curves ∴
“Taking a set” means the blade has developed a curve over time with use. This is not to be confused with finding a slight curve to the blade upon receiving it.
The heat treatment process can cause the steel of the blade to warp
slightly as it cools, but this does not adversely affect the crystalline
structure of the steel. Most bends, curves and kinks are removed by the
bladesmith whilst the steel is still hot and pliable, although getting a
blade dead-straight is quite an ordeal.
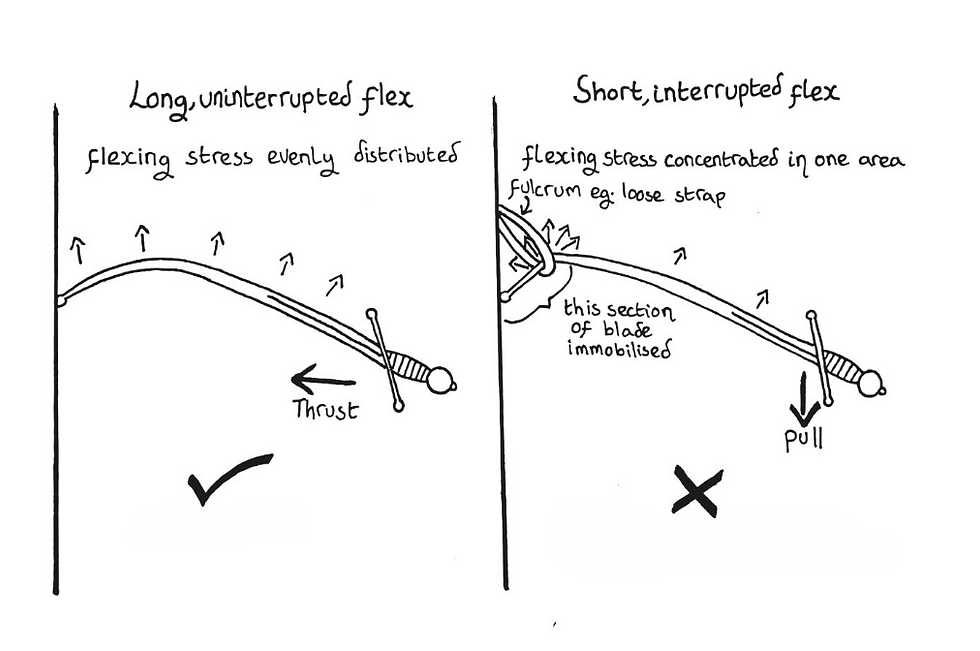
I tend to keep a slight bend in the body of the blade, whilst keeping the
tip on line with the grip. This is a technique used in sport fencing blades
to extend their lifespans and ensure an immediate flex on a successful
thrust. A dead-straight blade in good alignment requires far more force
to flex, and increases the chance of injury to your opponent.
∴ Sets & Bends: Cold Sets ∴
Should a significant bend occur soon after you receive your sword, it
may be due to a production flaw. Most makers test their blades before
dispatching them. We use the comprehensive Wilkinson system. In the
end, however, the most complete test is a couple of weeks’ training,
during which any problems should make themselves known.
If the blade is flexed gently and returns to its original shape it is
almost certainly a flaw in hardening, originating either at the steel
foundry or in the forge. A break can be caused by various problems. The
occasional issue is a statistical certainty, and you should contact the
maker for a new blade as they should be happy to make good.
Curves and kinks that occur during use are a result of the steel being overstressed. This can be cumulative or due to one extreme bend. This cold “setting” of hardened steel causes microfractures to form, which
can lead to a break. This is irreversible, short of melting the steel down.
Attempting to remove a bend by bending it back, especially near the tip,
is risky as the attempt stresses the steel again in the same area. Whether
the blade can be straightened after a set depends on the steel. Balefire
blades can generally be carefully bent back into shape once, but any
further stressing sets in that area could cause a break later down the
line. When such a repair is being attempted on a Balefire blade, contact
us for advice on the process.
Gentle curves develop in all fencing blades through use, and are less of a
risk factor as the stress riser is much longer along the blade and unlikely
to lead to a break or extreme set. If the tip wanders too far from true,
however, the blade is due for replacement.
∴ Sets & Bends: Avoiding Sets ∴
The most common cause of cold sets is the tip of the blade being caught
in clothing. Fencing gear with small straps and loops should be avoided,
especially as such snags often go unnoticed by the receiving fencer who
may well close in or twist, thinking the thrust has missed and adding
further stress to the trapped blade.
Tangling the blade in a complex guard is similarly common but usually
more noticeable. Most fencers are polite enough to halt the bout and
free the blade before continuing, avoiding any significant damage to
their partners’ equipment.
A less common cause is a fencer falling on a sword during a bout. This is
very dangerous to the fencer, and again most fencers will stop the bout
before serious damage occurs to sword or partner.
Blades can also be bent in transit - for example, when a tip pierces a hole in a sword bag and is dragged against the ground.
I have witnessed tips getting bent as a sword bag is yanked out of the
car, and once a very extreme bend after a blade got caught in an airport luggage carousel.
Investing in a good bag with reinforced ends, a solid case, or protective tubes for blades in a soft bag is always money well spent, as very few makers will consider these to be warranty issues.
∴ The Hilt: Blackened & Patinated Hilts ∴
Blackening or colour can be applied to steel in a host of different ways, but maintenance has commonalities for all. Crucially, don't sand these hilts, as abrasion will damage the finish.
Blackened and patinated steel show bright scratches when first
damaged, which will dull down and blend in over time as the surface re- oxidises. Black Sharpie ink is a readily available way to blend scratches in quickly if desired, as it has a good amount of adhesion to steel.
These surfaces are protected by their polymer/oxide coating to varying degrees, but water can still penetrate over time to cause rust. A prompt application of oil or wax to the rusted area stops it from spreading and dulls it down to match the darkened layer.
∴ The Hilt: Bright Steel Hilts ∴
Uncoated steel is more prone to rust, which should be removed as soon as it’s noticed as directed in the blade maintenance section.
Care should be taken to determine the original polishing direction of the finish, and the final passage should be in the same direction as the pre- existent markings. There should be faint lines in the steel to indicate this orientation. Moving the steel back and forth in the light and studying the reflection should bring them forth.
Cleaning inside rings, cups and baskets can be difficult to do and nigh-on impossible to do well - so care should be taken to dry inside the hilt after each use. A strong layer of wax between uses helps immeasurably too.
∴ The Grip: Wire-Wrapped Grips ∴
Twisted steel wire can easily fall prey to rust as it is exposed to the moisture and salt of the palm, and the high texture can inhibit cleaning. Brass and copper wire are less prone to oxidation but will dull down over time.
You can gently shine the wire by cutting a strip of denim and rubbing it
back and forth over the grip until it reaches your desired shine. Denim is
a very light and non-invasive abrasive, but if you want to go a little
further, you can use a very fine grit sanding sponge - but not sandpaper.
Don’t use any wax or cleaning paste such as Brasso, as this is likely to
cake visibly between the strands.
For more significant red rust, you can flow oil onto the surface to
stabilise it, then brush it with a brass wire brush to knock off any surface
flakes. WD40 will remove more rust, but may damage the adhesive the
holds the wire firm. I typically use a silicone-based oil.
∴ The Grip: Leather-Wrapped Grips ∴
Leather grips don’t need a great deal of care if they have been properly
sealed, which is pretty universal for well-made swords. The main issues
that can occur are wear due to friction from the palm - or on swords
with longer grips, cuts into the leather. In either case, a small amount of
wax will smooth the fibres down and blend the wear a little, prolonging
the grip’s usability.
If a cut has caused a flap of hide to separate from the lower binding,
spread a small amount of viscous superglue on both surfaces before
pressing them together firmly. This will prevent the situation from
getting worse. If the fix is done quickly and carefully with a certain
degree of finesse, an invisible repair is achievable.
∴ The Grip: Cord-Wrapped Grips ∴
Cord is a tough handle material that needs little care if it is well glued down. The main thing to watch for is a split in the fibre, which should be glued down as soon as possible to avoid any unravelling.
Superglue works well for this - the thinner type is good for stabilising fraying as it will soak the fibres and dry rock hard. The viscous type is better for securing the cord should it come loose from the core, as this will not soak away into the organic parts.
∴ The Grip: Bare Wooden Grips ∴
We do not recommend bare wood for sword handles, although it is common for knives. The only way it can be made stable enough for use is to glue it to the tang, and potentially rivet it on top.
Unsecured and unreinforced wood will inevitably split under pressure and vibration due to its fibrous nature. For longevity I would recommend binding the bare wood with linen cord, and then thin leather.
That being said, all wood benefits from a wax and buff - so keeping any bare wood on your sword well polished is always a good move. Thin superglue can be run into nascent cracks to prevent a longer split.
∴ Rattles & Wallow: Threaded Tangs ∴
The grip forms an integral component of the structure of a fencing sword. As the need for replaceable blades means the grip cannot be permanently secured to the tang, it is prey to greater wear from vibration and stress. These pressures cause the fibres to compact and the grip's shape to change, which causes it to loosen and shorten.
This in turn prevents it from holding the hilt components steady, and
can cause them to rattle. This rattling hammers upon the fibres of the wooden core and compacts them to deform the shape further. Additionally, tang vibration compacts the fibres forming the internal slot in the grip (wallowing), which increases the size of the slot and creates looseness in the fit of the tang (slog).

Banish That Rattle:
Much of the cure lies in prevention: a grip made of hard, stable, well-
aged wood with a tight fit on the tang is less likely to rattle. Having the fibres bound in place with a wrapping of cord, leather or wire likewise helps immeasurably. Unfortunately, variable atmospheric humidity can cause the wood to shrink or swell regardless, and the vibration of the
first few bouts tends to force the fibres to settle.
If there is a rattle, the sword needs to be tightened as soon as possible to prevent further damage. If tightening doesn't work a small spacer or washer may be called for between the components. Depending on the maker, a spanner, Allen key or pliers will be necessary.
When we first started Balefire Blades, I used the rounded nylock nut pioneered by Danelli armouries, for which a pair of pliers with a rounded, toothed jaw is best. We have subsequently transitioned to a faceted all-steel vibration resistant nut that has better performance over a long period, and tightens with spanner or pliers. Both variants make use of the entire threadway to secure the tang, and bear a pleasing resemblance to a peening block.
Beware overtightening an already sound sword, however, as that can cause compression and splitting. Firm should be enough - a vice and extended leverage is asking for trouble.
One important thing to check is whether the tang of the sword keys into the pommel, as different makers have different systems for this. If it
does, there is a maximum amount of tightening that can be applied, after which there is a risk of stripping the threads. Generally if the pommel rotates freely it is not keyed. If there is only a slight degree of movement out of true when loosened, it is keyed and may require a spacer if tightening the nut has already proved ineffective.
∴ Rattles & Wallow: Peened Tangs ∴
Peened swords with fully secured hilts, grips and pommels should need little care beyond that described in previous sections.
That being said, frequent heavy blows to the crossguard can dislodge it and lead to compression of the grip, causing a rattle which can be incredibly annoying. The system of construction I use now seems to hold up well, so I haven't had to do any repairs on peened Balefire swords - but I’ve learned a few tricks from fettling swords at events.
It is frequently advised online that if a peened sword hilt rattles, you should hit the peening button to tighten it up. Whilst this may work occasionally, a well-set peen should be slightly countersunk into the pommel, peening block or button, which is keyed to the tang. In this case, the most you will achieve by hitting it is bending the tang.
It should be noted that some manufacturers peen a threaded tang onto a threaded pommel or block, so further peening won’t tighten it anyway unless the threading is screwed tighter before hammering, which can be difficult with threads already deformed by the initial peening. By far the most likely culprit for loosening is the organic component - the grip - so repairs focusing on that area are the most likely to work.
If the cross rattles with no obvious gapping between it and the grip, it is probably a lateral motion. Given the massive slots in antique swords, one does wonder if this was even considered a problem historically - but cutler’s pitch was probably employed more widely back then.
Banish That Rattle:
For the modern fencer, running a large amount of liquid superglue down the base of the fuller to fill the void works really well. Put a ring of masking tape around the top of the grip to prevent it from leaking onto the leather. Run some glue in whilst holding the sword blade up, allow it to soak away, top it up, allow it to soak, and repeat until the glue level
stays stable.
Leave this to dry for a few minutes, clean any splashes off, then leave it to stand overnight with the blade pointing upward. I have fixed a few swords this way that have been used for a couple of years subsequently without rattling again. Good quality liquid superglue is essential here, and well worth the cost.
If the cross rattles and there is a gap between it and the grip, first check the grip for splitting. If it has split enough to shorten visibly, a new grip is the best solution - as all the glue in the world isn't going to correct the lengthy deformations.
If the grip looks structurally sound and it seems that the top has compressed a couple of millimetres under pressure, binding adhesive- soaked thread into the gap can work to fill the space. Glue alone won't work, and although an epoxy like Araldite will fill the gap I find the thread method works best.
Viscous superglue can be used to coat the thread - white Gorilla Glue has proven the best for this though, as it sets as a kind of resin. Take a thread the same size as the crack, wind it once around the tang through the gap, then continue to wind it around whilst coating it in adhesive until it comes flush with the surface of the grip. Pull it tight between the thread coil and the cross, then trim. Coat the outer layer of thread one last time, use the superglue trick described above to fix the cross in place, and
leave it to dry overnight.
∴ Conclusion ∴
This guide covers almost every troubleshooting scenario you are likely to come across in your sword's lifetime. However, if you're in doubt at any point we would recommend contacting the sword's maker for their
expert advice.
Of course, even the best-made fencing weapon has a natural lifespan - after all, it's likely to take hundreds or thousands of hits on your behalf! Many beloved swords take on the legacy of a "grandfather's axe" over
time: a replacement blade here, a new grip there, yet still the same sword in spirit.
Our aim with this manual - and indeed with our craft itself - is to give you as many years as possible of fantastic fencing with your favourite swords.
Remember, as a general rule preventative care is half the battle won. Just five minutes with a file, sanding block and wax after a heavy fencing session could spare you a number of ills down the line.
Oh, and don't throw it in a lake.


